We offer a wide range of services for that fresh look, or just maintenance or updates to keep your home functioning and safe. Regardless of the size of the job, we have a craftsman that can tackle it. We offer a wide range of services for that fresh look, or just maintenance or updates to keep your home functioning and safe. Regardless of the size of the job, we have a craftsman that can tackle it.
Drywall / October 15, 2025
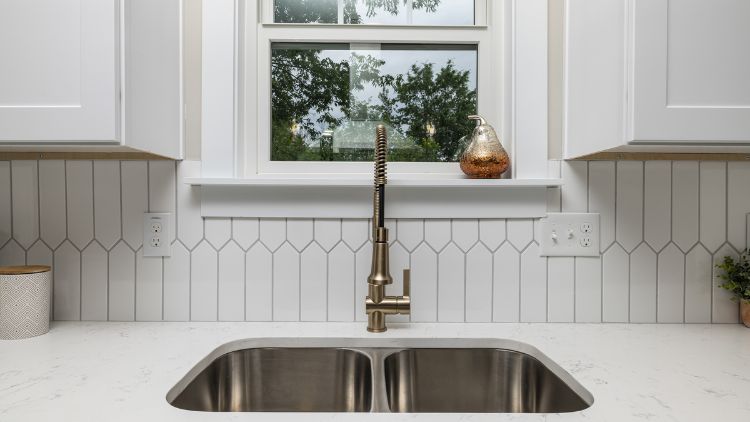
When renovating a kitchen, most people focus on selecting tiles, cabinetry, and countertops. Yet one of the most overlooked elements—grouting—can have an outsized impact on the outcome. At Handyman Connection Calgary, we’ve repaired and replaced countless backsplashes due to improper application of this essential material. A flawless finish not only enhances aesthetics but also prevents long-term issues like water damage, cracking, and staining.
Just as the Calgary Tower has withstood decades of extreme weather conditions, a properly installed backsplash with well-applied joints can endure years of splashes, scrubbing, heat, and humidity—when done right.
On the surface, joint filler seems like a simple compound meant to fill gaps. But in reality, it serves multiple vital functions:
Without proper application, even the best tile installation is vulnerable to failure over time.
Choosing the correct formulation ensures both performance and longevity. There are three major categories:
The width of the space between tiles plays a significant role in determining the appropriate type:
Some materials require very specific treatment. For example, glass tiles—popular in many modern kitchens—are best finished using non-abrasive filler to maintain clarity and avoid surface damage.
Material composition affects ease of installation and maintenance:
We’ve seen a trend among Valley Ridge and Aspen Woods clients toward epoxy-based materials despite the initial investment. Their low-maintenance appeal and long-term reliability make them worth the cost.

Having the right tools is half the battle. Whether you’re updating a kitchen or building a backsplash from scratch, Handyman Connection equips its teams with industry-grade supplies to deliver flawless finishes.
Using clean water is especially critical during the wipe-down phase. Dirty rinse water can redeposit haze, ruining the appearance of the tile surface.
Proper preparation is just as important as the application itself. We recommend the following steps for a successful project:
In our experience, especially in neighbourhoods like Seton or Mahogany with newly constructed homes, prepping carefully can make or break the final outcome. Taking shortcuts at this stage leads to poor adhesion and early cracking.
Handyman Connection follows a detailed process to ensure optimal performance and appearance.
Darker-coloured materials can stain lighter tiles if left too long, so we reduce our working area to 2–3 square feet in those cases.
This phase is critical. Too much water can weaken the compound and cause discolouration.
We always advise homeowners to avoid scrubbing or exposing new joints to moisture during the curing phase. This ensures long-term durability.
Even with proper planning, problems can occur. Here’s how Handyman Connection addresses them:
This is the most frequent complaint from homeowners. Prevention is best, but if it occurs:
Often caused by poor mixing, temperature fluctuations, or excessive water:
This usually results from uneven drying or improper water-to-powder ratios. Our trained professionals use manufacturer-specified mixing instructions to maintain uniformity.
Many clients in Calgary’s inner city and surrounding suburbs are surprised by how such a small component can affect an entire room. Proper joint finishing offers the following long-term benefits:
In essence, what seems like a finishing touch is actually a crucial structural and aesthetic element.
There’s no substitute for experience. Our Calgary-based team brings years of hands-on expertise, ensuring every tile and seam is installed with precision. We:
Kitchen backsplashes are exposed to some of the harshest conditions in a home—heat, water, grease, and constant cleaning. Investing in proper installation, from tile selection to joint finishing, pays off for years to come.
At Handyman Connection, we treat each backsplash like it’s the most important part of your kitchen—because when it’s done right, it is. Whether you’re updating a small corner or renovating the entire space, our expert tile services are designed to give you peace of mind and a polished, long-lasting result.
Reach out today to book your professional backsplash services in Valley Ridge and get the lasting craftsmanship your kitchen deserves.
206 2915 21 St NE
Calgary, AB T2E 7T1

© Handyman Connection 2026 | Privacy Policy
 403-735-3257