We are excited to announce that a long time Master Craftsman of our business is now the proud new owner; please join us in congratulating Earl Swader as the new owner of Handyman Connection of Blue Ash. Earl has previous business ownership already under his belt and is looking forward to continuing to serve the Blue Ash community as the proud owner.

Home Maintenance / November 21, 2016
We’ve spent countless hours cleaning our house, with a majority of the time spent cleaning up bathrooms. You may start to get frustrated with certain problem areas. One of those common problem areas in the shower is chipped grout or grout that just won’t get clean. That may be an indication that it’s time to re-grout it. Our crew at Handyman Connection of Blue Ash has your back, and has put together a few pro tips as you tackle re-grouting your shower.
Phase 1: Remove Problem Grout
To start, you’ll need to remove any of the problem grout including old, chipped, or stained grout. Take your time with this, as you’ll want to go ahead and remove as much as possible. You can use grout removal tools to help with this step. The tools will help you chip away the problem grout. It will likely start coming off in chunks. Be sure to get all of the problem grout, but also be sure to work slowly so you don’t damage any of the shower tiles in the process. After you’re done chipping away the grout, remove it from the area and discard of it.
Phase 2: Mix the Grout Solution
After you’ve purchased the grout solution, follow the instructions to create the consistency of the grout mixture in order to start applying it. Make sure you let it sit for a little while, and remix it a second time so that it’s combined properly making it easier to apply. The key here is to follow the instructions exactly as each grout mixture may be slightly different than others. It should have the same consistency as mayonnaise when it’s ready.
Phase 3: Application #1
Now you can begin applying the grout to the wall and around the tiles. Use a grout float and work in upward strokes. Don’t worry too much about getting in the joints on this first application, but you will want to work quickly as the grout tends to dry and harden at a rapid pace. If you don’t work quickly enough, it’ll be extremely difficult to remove it from the tops of the tiles.
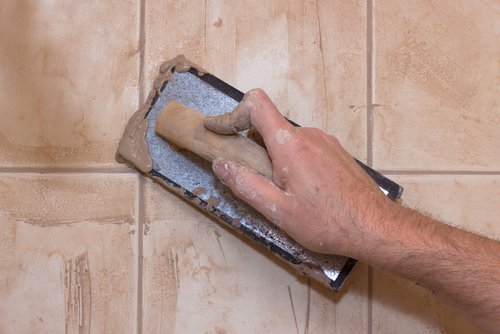
Phase 4: Application #2
On the second round of application, position the grout float into a 45-degree angle to fill the joints. When you are doing this press really hard so that the grout completely fills the joints. You can easily shape the joints with the corner of your tool. After the joints are completely filled in, remove the grout from the wall and tiles with a damp sponge.
After the grout is dried, which tends to be quick, remove any excess grout from where you’d like to finish the shower with caulk. If you’re not sure how to caulk the shower, give us a call and we’d be happy to help or happy to tackle the project for you. Don’t forget that our expert craftsmen at Handyman Connection of Blue Ash are here to help with any of your home maintenance projects.
11115 Kenwood Rd.
Blue Ash, OH 45242

© Handyman Connection 2026 | Privacy Policy
 (513) 771-3950