We are excited to announce that a long time Master Craftsman of our business is now the proud new owner; please join us in congratulating Earl Swader as the new owner of Handyman Connection of Blue Ash. Earl has previous business ownership already under his belt and is looking forward to continuing to serve the Blue Ash community as the proud owner.

Home Maintenance / October 20, 2016
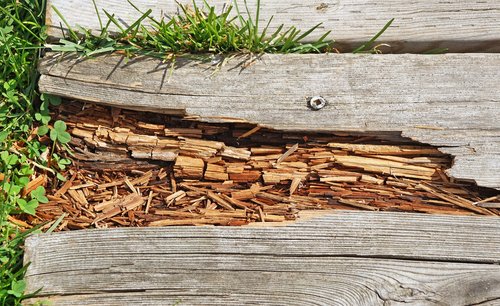
Owning a home results in lots of responsibilities that you wouldn’t have had to do before. Home maintenance and repair work can be a headache, but it’s an inevitable part of being a homeowner. One of those jobs that can come up every now and then is fixing and repairing small areas of wood rot. Surprisingly enough, rotting wood can actually be repaired without having to completely replace the entire board it’s rotting in. Our crew at Handyman Connection of Blue Ash has put together a few tips along with some steps to help you fix and repair a rotting area of wood.
Rotting wood can be caused by lots of different occurrences and elements, with the most common being exposure to moisture and water damage. If that’s the case with your rotten wood, it’s possible to remove the section that is rotten and replacing the hole with wood filler.
Step 1: Materials
First, you’ll need to gather up your materials. You might have most of the tools at home, but these are some of the tools and materials that you’ll need.
Step 2: Examine the Area
Next, carefully examine and determine the precise location and source of the rot. Rots are easily identified if the wood is a darker shade, is green, and/or if the area is softer than the surrounding areas of the wood. Once you’ve located the rot(s), and if the areas are small enough to handle without removing the entire piece of wood, you can remove the rotted wood with the chisel on your hammer. Scrape out as much as you can and include the surrounding area close to the rot. If it’s easy to get out without a power tool, you’ve located the root.
Step 3: Fill It Up
While the wood is exposed and after you’ve completely removed the rot, apply protective products such as wood hardener. Also, consider investing in sealants that are designed to protect from moisture and prevent fungi. Our crew at Handyman Connection of Blue Ash would recommend doing this since you are already taking the time to fix the rot.
Make sure the area is completely dried out and free of moisture, and then you can fill the damaged area with a patching compound solution. Most of the time it dries fairly quickly (about 10 minutes). As you apply the substance with a putty knife, make sure to fill the hole up completely with a small amount of overflow to overcompensate. Place wax paper over the top to secure the substance in as it dries. After about 30-40 minutes, remove the wax paper and sand down the area. Then, you’re free to refinish the wood, as you’d like to match the surrounding wood.
Try to reduce the chance of contact with moisture to ensure a long-lasting solution.
Our crew at Handyman Connection of Blue Ash is here to help with any and all of your home maintenance and repair jobs. If you have questions about replacing rotten wood, or if your problem is a little bigger than anticipated, give us a call to take care of it for you.
11115 Kenwood Rd.
Blue Ash, OH 45242

© Handyman Connection 2026 | Privacy Policy
 (513) 771-3950